Self Levelling Compound Guide for Tilers
How to Use & Make Your Floors Flat


1. What is self levelling compound and what is it used for?
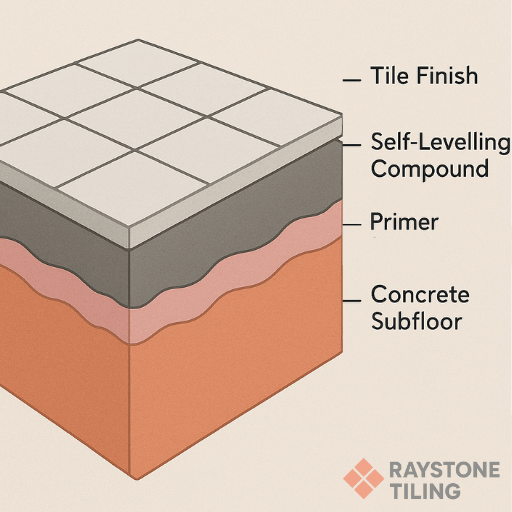
Self- Levelling Compound is a cement (grey) based floor smoothing material designed to create a perfectly flat and even surface under gravity before laying tiles.
Have you ever tried laying tiles on an uneven floor? I know how quickly things can go wrong when tiling. Even few millimetre depression in the floor can throw the tiles off. That’s why tilers use self levelling concrete mixes, to make the surface flat before tiling. They’re ideal for smoothing out dips and minor uneven areas.

Where do you use self levelling cement compounds:
- Before Tiling Floors – easy fix for dips, slopes, and low spots
- Over Underfloor Heating Systems – by giving flat surface and distributes heat evenly across the floor
- Over Timber or Plywood – you can use latex based or flexible self levelling mix (you need to apply right primer – more about it here)
- Commercial Spaces – like warehouse floors
2. How to calculate self levelling concrete coverage?

Self-Levelling Compound Calculator
Add dips with flat depth, slope by angle, or slope by measurements
*Coverage based on: 5 m² @ 3 mm per 20 kg bag (≈0.015 m³ per bag)
3. What types of self-levelling underlayment are there?
| Type | Best For | Key Benefit |
|---|---|---|
| Standard Cement Based | Concrete or screeded floors | Creates a level base for tiling |
| Latex Modified (Flexible) | Wooden floors or areas with slight movement | Improved flexibility and crack resistance |
| Fast-Drying | Quick turnaround projects | Tile ready in as little as 4 hours |

4. What primer should you get before using self-levelling compound?
| Subfloor Type | Recommended Primer | Purpose / Benefit |
|---|---|---|
| Concrete or Cement Screed | Acrylic or PVA-based primer | Seals porous surface and improves bonding |
| Old or Dusty Concrete | Deep-penetrating acrylic primer | Strengthens surface and prevents losing bond |
| Wooden Floors (Plywood, Chipboard) | Flexible latex-based primer | Improves adhesion and allows slight movement |
| Non-Porous Surfaces (Porcelain Tiles, Epoxy, Smooth Concrete) | Epoxy or grit-added primer | Bonds well |
| Anhydrite / Gypsum | Special acrylic primer for gypsum substrates | Prevents reaction with cement and avoids blistering |
| Underfloor Heating Systems | Standard acrylic primer (compatible with heating) | Promotes even spread and reduces air bubbles |
Happy Tiling!

Frequently Asked Questions — Self Levelling Compounds
Can you use self levelling compound on wooden floors or floorboards?
Yes, you can. Wood expands and contracts, so you need to use the right materials. Apply the correct primer (latex-modified) before pouring the mix. A common solution for older homes is also a latex-modified self-leveller for added flexibility.
Can you pour self levelling compound over tiles?
Yes you can. First make sure that tiles are solid, clean, and not greasy. Then apply epoxy or a grit primer for better bond (always read the product labels).
What is self levelling compound with fibres?
Added fibres increase durability. Fibre reinforced compounds are stronger and more resistant to cracking caused by construction movement and are used in high traffic areas.
Can you use self levelling compound outdoors?
Standard compounds are for indoor use only. If you are doing patios, garages, or steps use exterior compounds or fibre reinforced versions (with right outdoor primer). Why? Outdoor levelling need higher level of water resistance.
Can you tile directly over self levelling compound?
Yes, once it’s fully dry and solid (check the label for waiting time). You also, typically don’t need to apply primer over a self-levelling compound (check the product label to confirm).
What’s the difference between self levelling compound and self levelling concreate?
- Self levelling compound – its a finer cement, smoother version, used tiling preparation.
- Self levelling concreate – name used for heavy duty levelling jobs.
How to remove bubbles from self levelling compound?
Pour it evenly and guide it with a trowel then use spiked roller to remove air bubbles.
How long does self levelling compound take to dry before tiling?
Compounds usually need 12–24 hours before you can start tiling. You can also get more expensive fast drying sets that can dry in few hours.
How thick can you pour self-levelling compound?
Standard compounds can be between 3 and 10 mm. With more money you can go up to 25 mm if reinforced with aggregate.
Need a Quote?
Professional tiling services in — Tamworth, Lichfield, Sutton Coldfield, Nuneaton. New kitchens splashbacks, bathrooms & floor.
Friendly advice and no-obligation quotes.

